Inside the Brompton Wide Range (BWR) Hub

It has been quite a while since I have written anything technical about bikes. This is largely a result of the fact that for the first time since I started cycling again as an adult I have been relatively happy with my bikes and their configurations, which has left me free of my usual desire to acquire shiny new bicycle parts. However, this state of relative satisfaction with the bikes does not mean that things don’t occasionally wear out or break. Last week  I noticed a familiar clicking sound coming from the rear hub of the Brompton.

I have written previously in reasonable detail about the Servicing the Sturmey Archer AW hub. The BWR hub used in the six-speed Bromptons is also a three speed hub gear made by Sturmey Archer, so I thought I would show how the BWR compares to the pictures I took of the 1976 AW hub for the aforementioned post.

AWvBWR1

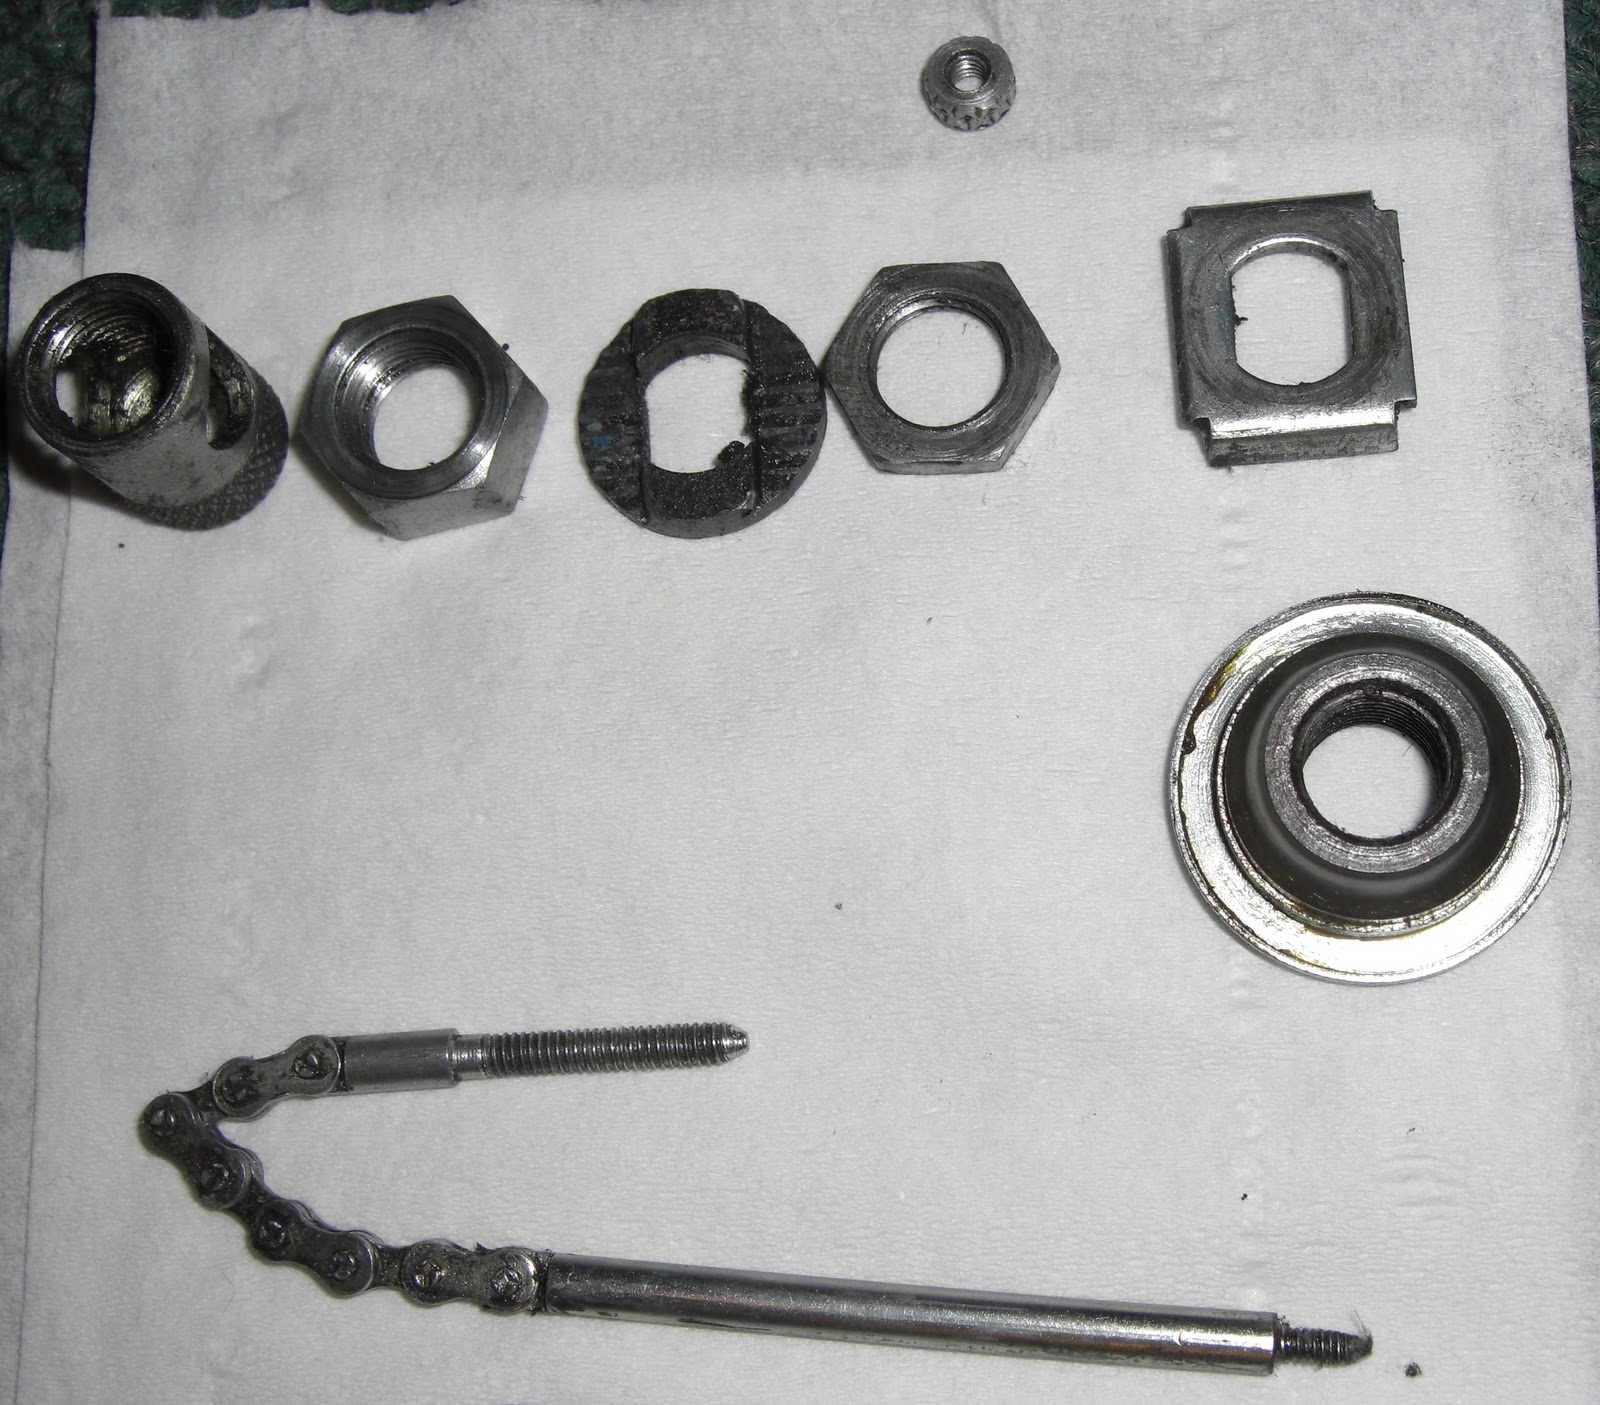
The planet cage differs significantly between the old AW hub and the BWR. The planet cage on the AW sits on top (drive side) of the sun pinion and can be simply lifted off during disassembly. This is also the case with the new AW and S-RF3 hubs without the ‘intermediate gear’ (sometimes referred to as NIG versions). The BWR differs in that the planet cage is split into two pieces, the bottom of which slides on from the bottom (non-drive side) and the top slides on from the top (drive side) and is fixed onto the bottom piece with the 4 M3 cap head screws shown in the picture above. The result of this is that the planet cage is stuck on the sun pinion. I decided not to disassemble to two-part planet cage as the first screw I tried to loosen was very stiff and it didn’t seem worth risking snapping the screw for this job. The low gear pawls seen at the bottom of the planet cage on the BWR are similar to those on the NIG AW and S-RF3 hubs (which are also retained with a circlip). These pawls are what produces the characteristic ‘tick-tick-tick’ of Sturmey Archer three speeds in their second and third gears.

AWvBWR6

The planets of the BWR have 12 teeth and revolve around a 34-tooth sun pinion, which produces wider-spaced gearing than the AW which has 20-tooth planet and 20 tooth sun pinion. These smaller planets require smaller pins than the standard range three-speed hub.

AWvBWR2

The clutch of the BWR differs noticeably from that of the old AW, but is the same as in the NIG AW and S-RF3 hubs. The axle key is fitted in the slot underneath the clutch in this shot (not fitted in the picture of the AW) and is also the same as in the new standard range hubs.

AWvBWR3

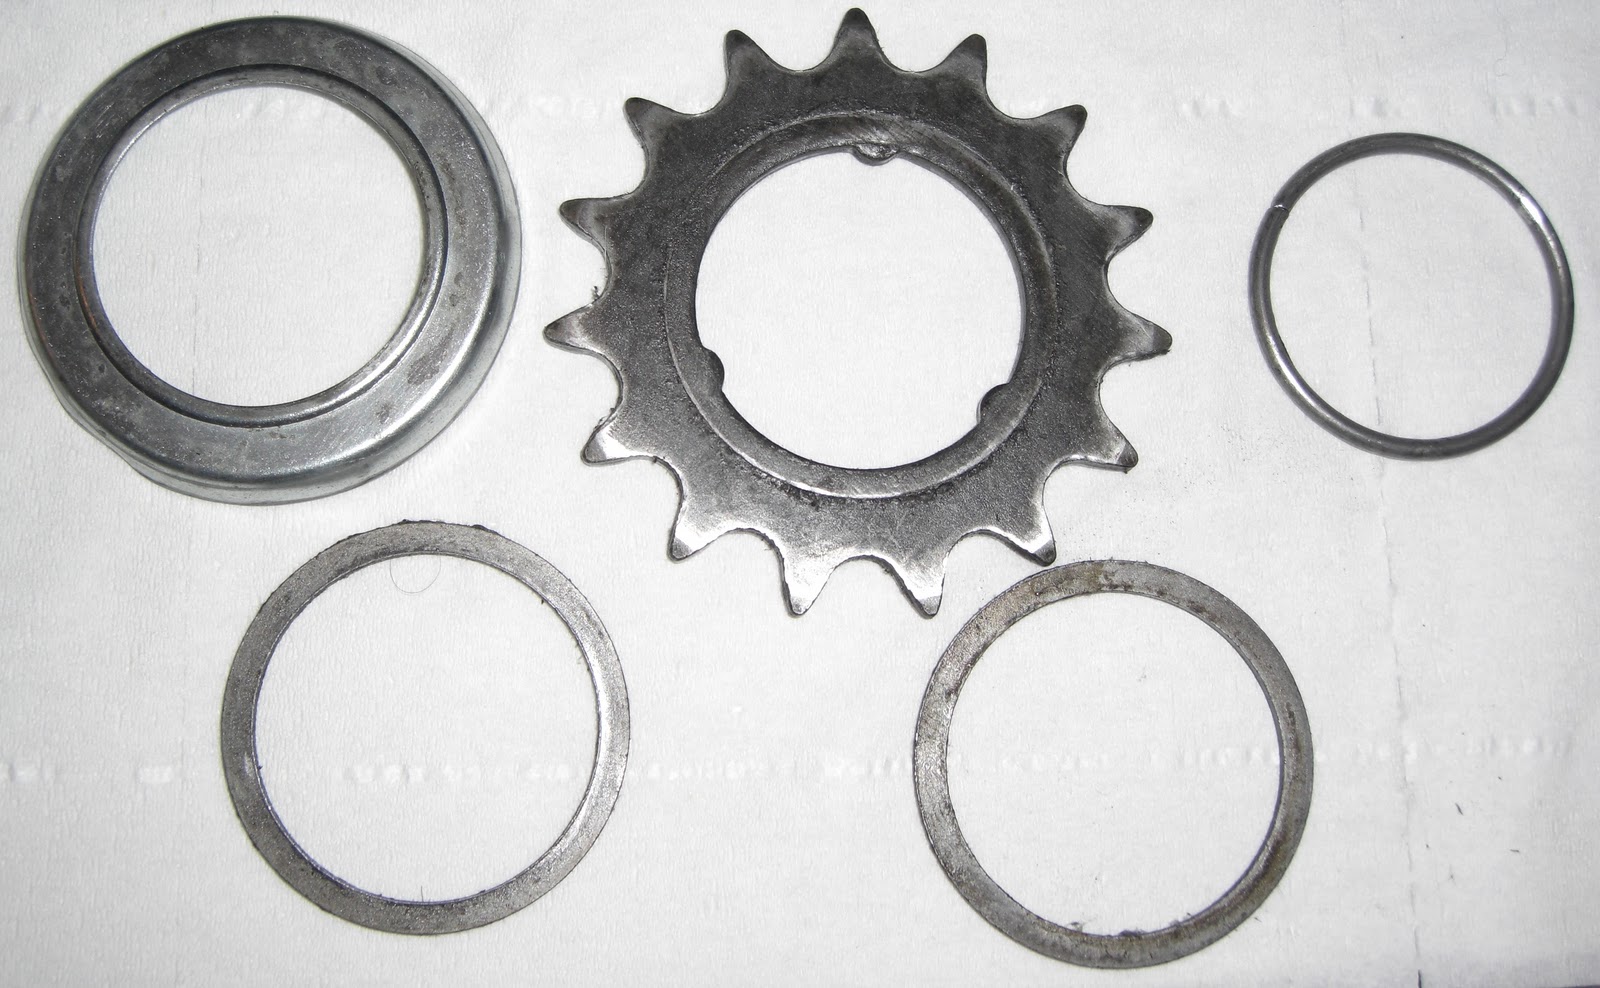
The gear ring has 60 teeth in the old AW, new NIG hubs and BWR. The differences between the 1976 AW hub and the BWR shown are largely superficial. The easily lost wire pawl springs are still used in the BWR gear ring. The gear ring pawls are disengaged in first gear, which is why there is no characteristic ‘tick-tick-tick’ sound.

AWvBWR4

The ball ring is another part which has changed little between the old AW and BWR shown. The only major difference appears to be the addition of two extra notches for removing the hub internals using a C-spanner or hammer and punch. The AW ball ring has a metal dust/bearing retaining cap which has been replaced in the more modern hubs with a plastic retaining ring for the ball bearings.

AWvBWR5

Here we can see the difference between the driver of the old AW hub and that of the BWR. Whilst the AW is designed to take a single three-splined sprocket, the BWR is designed to take a pair of Shimano-style nine-splined sprockets. Like the clutch, the internal portion of the driver was changed between the old AW and the new NIG AW, S-RF3 and BWR in order to fix the issue of the ‘intermediate gear.’ Other than being extended and having a different spline pattern for the two-speed cassette, the BWR driver is the same as that used in the NIG AW and S-RF3.

Aside for the problem of water ingress, the driver was where I found the source of the problem I was having with the BWR hub; the bearing surfaces on the driver and cone nut had some pitting on them. This is an issue I have had with every variant of the Sturmey Archer NIG three-speed hub, but oddly never the old AW. This does not seem to be a problem which afflicts other people with the same frequency and may be a result of the way I ride or the conditions my bikes are subjected to.

Thankfully in the past I have been able to order a replacement driver from SJS Cycles (who stock a great range of Sturmey Archer hub spares) but I could not find the BWR driver  (Sturmey Archer part number: HSA800) on their site. I emailed SJS to enquire about this part and was told that Brompton only issue them for service, in order to be supplied with a replacement driver from Brompton you need to send the old one back to them. I was quite surprised by this; as my primary means of transportation I can’t afford to have my Brompton out of action for the sort of time required to perform such an exchange. If I lived somewhere with a Brompton dealer who did Brompton servicing in a meaningful way (i.e. not Chester) perhaps there would be a better way of doing this, but here in Chester I would have to go through The Bike Factory who do not keep Brompton spares in stock.

I am not sure why Brompton has chosen to restrict the supply of BWR replacement parts. Outside of a big city with a selection of Brompton dealers, in order to be able to depend on a bicycle with this hub there needs to be a supply of spare parts available. I doubt that Brompton are selling the BWR driver at a loss, so even if some of them went to tinkerers and enthusiasts (e.g. turning a S-RF5 into a ten-speed on a Brompton) it would not be detrimental to their business. It is a truly baffling move by Brompton which serves only to make the BWR a less viable option for people like me. Whilst decades-old AW hubs still have spare parts readily available, I am not sure that I will be able to fix this BWR hub up as easily as the 36 year-old AW shown in the pictures above, and that leaves me a bit disappointed in Brompton.

The Raleigh Cameo Project

Walking home from the shop on Sunday I spotted a pair of bikes by the dumpsters at the end of a terrace. The one closest to me was a low end Halfords house-brand mountain bike. I wasn’t going to look any closer, but I spotted a Sturmey Archer AW hub on the bike behind and decided to take a closer look. The second bike was a Raleigh Cameo, one of the various names given to what is basically a ladies Raleigh Sports.

The rear hub is stamped 11.79, the front wheel is missing. I assume that the front wheel was stolen and the low value of the bike in its current state led the owners to simply give up on it.

There are a few rusty spot on the frame, in keeping with the age and condition of the bike, but it is otherwise sound. The front mudguard looks as if it could be persuaded back into its original shape, but sadly the rear mudguard is missing (except for the remains of the right stay, which is caught in the wheel). The rear rack is not original, not to mention hideous. The saddle is a pretty basic mattress saddle of the era.

The fork has the same crown as my DL-1, the lug-work is also quite similar. The frame is quite similar to the step-through version of the DL-1, differing mainly in the seat and head-tube angles, which are slightly steeper on this model. With a bit of work, it could make quite a nice (third) bike for Ms. C and a loaner for visitors.

Finding this bike gave me an idea for a project. Seeing as the bike was free, I thought it would be interesting to try and restore it to a functional state using either free, cheap, hand-me-down or trade parts. These bikes (and very similar non-Raleigh models) were very common in their day, so it should be possible. Stay tuned for updates.

Raleigh Twenty Stowaway

The Sturmey Archer AW hub which was used for the pictures taken to make the hub servicing guide which formed my last post was from this Raleigh Twenty Stowaway; the folding version of the classic Raleigh Twenty. This Twenty belonged to a friend of mine and I was servicing the hub before selling it on her behalf. Prior to servicing the hub, I had done just about every conceivable bit of maintenance on this bike including front wheel, headset and bottom bracket bearings, a complete disassembling, cleaning, greasing and reassembling and replacement of the tyres, tubes, chain and saddle. As a result of this, the bike rides just like a brand new bike, despite being from 1976.
Raleigh used the ‘Stowaway‘ branding on some of their folding Twentys (in addition to several unrelated models).
The main hinge in the frame is perhaps inelegant but very sturdy.
Difficult to see on the picture, but the rear reflector is branded as Sturmey Archer.
Pletscher rear rack, complete with a rat-trap for carrying a newspaper.
Sturmey Archer AW hub, as featured previously.
The original Sturmey Archer grip shifter, controlled by rotating the entire grip to switch gears. In practice it works better than I expected.
Raleigh TwentyR-20‘ branding.
Seat-tube decal.
The Raleigh‘ Nottingham headbadge.
Brand new Raleigh Record tyres, as originally specified with the bike.
The Raleigh Twenty design has undoubtedly passed the test of time. It is a shame that the equivalent models subsequently made by Raleigh have failed to match the comfort, handling and practicality of this model. Clones of the Twenty do exist, although they have their drawbacks including price and the use of V-brakes on the UK model. There is nothing to stop Raleigh bringing back the Twenty properly, a good, small utility bike could be a good addition to their range. A few concessions to modern manufacturing techniques and componentry could be made, such as a welded frame (rather than brazed) a unicrown fork (rather than lugged). These minor sacrifices could easily be offset by a few improvements, such as dual pivot caliper brakes (or drum/coaster brakes), 406 mm aluminium rims (allowing a greater choice of tyres and the ability to stop during rain) and a proper headset (rather than a nylon bushing at the top of the head-tube).
After courting the ‘sporting goods’ and ‘bicycle shaped object’ markets extensively for the past few decades, perhaps it’s time for Raleigh to look back on one of the models which once made them great, and bring it back.

Servicing a Sturmey Archer AW hub

The Sturmey Archer AW hub is 75 years old this year. The reliability of this design means that there are plenty of these hubs still in service. The ease of serviceability of this design means that returning one of these hubs to its former glory isn’t all that difficult. Many minor issues such as resistance to freewheeling, hub seizure, general resistance to rolling and problems accessing certain gears can be fixed by taking the hub apart, cleaning the internals and re-assembling it all with some fresh grease.
Whilst I have written about working on an AW hub previously, the nature of the work means that it is difficult to take pictures whilst cleaning and re-assembling the hub. Thankfully, this time I was able to get a little help with taking pictures. To open up an AW hub (and most other Sturmey Archer hub gears) remove the left-hand (non-drive side) locknut and cone and uncrew the right-hand ball ring using a hammer and a flat screwdriver on the semi-circular cut outs of the ball ring (these are not rounded on the older versions of the AW). This should let you get the internals out, axle and all. This can be further disassembled by removing the right-hand locknut and cone, which allows the rest of the hub mechanism to be taken apart.
One of the notches for unscrewing the right-hand ball ring
Left to right: The left-hand axle nut, non-turn washer, locknut, spacer and cone
Left to right (top): right axle nuts (later integrated into a single piece), non-turn washer, locknut, cone lockwasher & cone. Middle: cone. Bottom: indicator rod (with indicator rod locknut seen above the locknut)
Left to right (top): Dust cap, sprocket snap-ring. Bottom: spacers. Assembled as: Dust cap, spacer, sprocket, spacer, snap-ring.
The driver assembly and clutch spring
Gear ring (left) and right-hand ball ring (right)
Left to right: clutch sleeve, clutch, axle key and thrust ring
Top: Axle (including sun pinion). Bottom (left-to right): Planet-cage, 4 planet pinions (cogs) and 4 pinion pins.
The low-gear pawls in the planet-cage can also be removed if necessary, although when removing these be sure not to lose the tiny pawl springs in the process. The same also goes for the pawls in the gear ring.
Once all this has been disassembled, a good cleaning with some degreaser and a cloth or paper towel should restore the hub to its former glory. Particularly dirty or rusty parts can be soaked overnight or cleaned with wire wool (just make sure to remove any left-over bits of wire wool before re-assembling the hub).
To re-assemble the gear mechanism, hold the axle vertically with the drive-side pointing up (axle hole above the sun pinion).
Add the planet pinions and the pinion pins back into the planet cage and place the assembly over the top of the axle with the planets at the top.
Add a dab of Sturmey Archer hub gear grease to the planet pinions and rotate the planet cage assembly around the axle a few times to distribute the grease around.
Place the clutch sleeve over the axle and line up the hole in the sleeve with the hole in the axle.
Place the clutch over the axle and the clutch sleeve.
Slide the axle key through the hole in the clutch sleeve and axle, with the threaded hole in the axle key lined up with the centre of the axle.
Slide the thrust ring over the axle key and clutch, lining up the grooves in the thrust ring with the protruding parts of the axle key.
Place the gear ring over the planet cage assembly and clutch assembly, being sure to line up the grooves inside the gear ring with the planet pinions.
Place the right-hand ball ring over the gear ring.
Add some lithium grease to the ball bearings within the ball ring (ideally more neatly than this).
Place the clutch spring over the axle, ensuring the plastic (or metal) ringed-end of the spring pointing upwards.
Place the driver over the axle. The clutch spring will push against the driver until the right-hand cone is added to hold the driver in place.
Add lithium grease the the ball bearings in the driver assembly and screw the right-hand cone onto the axle as with any other cup-and-cone bearing system.
Add the cone lockwasher and locknut.
Add lithium grease to the left-hand bearings.
Add the left-hand cone, spacer and locknut.
On the right-hand side, add the dust-cap, a spacer, sprocket, another spacer and snap ring to the end of the driver assembly.
The wheel may be bolted back into the frame, the indicator rod screwed back into the axle key and to the gear cable and the hub is ready to be tested. With any luck, the hub should perform just fine for another couple of decades. The ‘no intermediate gear’ (NIG) versions of the hub, such as the current AW hub, the S-RF3 and the gear mechanism in the X-RD3 are fairly similar to this, with minor changes to the clutch assembly and the driver, which has its own pawls in this version. There have also been numerous small revisions throughout the run of the original AW hub, although they should pose little trouble when using this guide as reference. The best advice I can give anyone who wishes to service one of these hubs is to just go for it; when disassembled the hub really isn’t as daunting as it may appear from reading this guide (or similar guides).

Bicycle Work Digest

It has been a while since my last post, mainly due to all of my free time being used up with doing bike-related things, leaving me without the time to write about them.

Brompton:

I noticed that in addition to the noise from my folding pedal (which I can live with based on the cost of a replacement), There was some noise coming from the bottom bracket. The Brompton uses a FAG-type cartridge bottom bracket, and the replacement part is relatively expensive. I decided to opt for a cheaper generic bottom bracket cartridge with Shimano-style splined cups.

The standard Brompton bottom bracket, with soft plastic cups

I initially expected that I’d be able to remove the old bottom bracket with a hammer and punch because I didn’t have to worry about damaging it. However, I discovered that the cups on the original bottom bracket are made of a fairly soft resin which simply splits when approached this way. I eventually bought the proper tool and the bottom bracket co-operated with the removal process after that. The bike is quieter now, but there is still a fair bit of noise from the (non user-serviceable) folding pedal.

CIMG2633

The new bottom bracket cartridge, sitting in the bike.

In other Brompton news, lovely girlfriend has managed to get hold of a 2000 model L5 (equivalent to an “M5L” in the modern nomenclature). This model comes with the Sturmey Archer 5 speed Sprinter hub, which offers a good gear range with a price, it requires particularly perfect indicator rod adjustment to get all of the gears to work at the same time. I believe that the right-hand cone needs adjusting slightly, as I am only able to consistently get gears 1,3,4,5 or gears 2,3,4,5 to work at the same time.

The L5 also needed a new front brake cable, indicator rod and rear mudflap, which have all since been fitted and the bike is currently working very well. The Marathon Plus tyres it has make the bike feel noticeably smoother and faster than my Brompton, and the wider gears range is pleasant too. Hopefully Brompton will see sense and start speccing the X-RF8 hub as an option in the near future. It also came with the special Brompton version of the Brooks B17 saddle, a luggage block and an older version of the Touring Pannier (now T-bag) from back when they were made by Carradice.

DL-1:

After fitting the anti-rotation washers to the back wheel last week, I rotated the reaction arm slightly to compensate for the re-positioning of the axle in the frame. In the process of doing this, I inadvertently over-tightened the left-hand cone making the ride feel “draggy.” Thankfully this was an easy fix once the wheel was out thanks to the two grooves on the “washer” which locks into the cone on the other side of the drum brake. This allowed me to adjust the brake position and re-tighten the locknut without it tightening the cone at the same time.

Xrd3 axle

Taken from the X-RD3 manual, the special washer (31) which sits between the cone (not shown) and locknut (29) is highlighted in red.

because this job was non-urgent, I put it off for quite a while. Now the bike is back to normal I really appreciate just how wonderful it is to ride.

Kona Africa Bike:

After giving this bike to lovely girlfriend, she never really felt safe in start-stop traffic because of the coaster brake preventing her being able to rotate the pedals into an ideal position to set off. In the end, we decided that replacing the 3 speed Nexus hub with a roller-brake version would be best. I disassembled the wheel and intended to use the old spokes with the new hub, only to find out the flange diameter of the new hub was slightly bigger and the old spokes were too long. After ordering some new spokes which were a few mm shorter, I built the wheel up without too much trouble (no severe dishing required as with derailleur gears).

242098_627826661047_286602234_5328884_6911934_o

The new wheel, before the cable had been installed. Note the brake arm with the hold for the cable clamp to sit in.

The roller brake idea is particularly good, unlike Sturmey’s drum brakes, the roller brake is a completely separate module which sits on some splines on the left hand side of the hub. If the brake fails, or you want to fit a better version, it can simply be replaced without re-building the wheel. The brake slots onto the splines and is held in with a simple locknut. Other than that, the mechanism is similar to Sturmey Archer drum brakes, except they don’t need a special brake cable, the barrel adjuster and cable clamp come with the brake, all you need to use is a standard brake cable. Upon testing the bike, the roller brake provided an impressive amount of stopping power for a low-maintenance, non-performance-oriented component. This is one of the most basic model roller brake Shimano makes

Raleigh Twentys:

I recently acquired a pair of Raleigh Twentys which I am reconditioning on behalf of a few friends. One is a 1974 “Shopper,” the other is a 1980 model with a rear Dynohub. I tested the Dynohub with my Brompton lights and it was perfectly able to power the front and rear LED lights despite its lower official power rating than modern dynamo hubs.

CIMG2637

The Dynohub AWG on from the 1980 Twenty

A previous owner has attempted to fit road bike caliper brakes and drop bar brake levers to the 1980 Twenty, which will have to be swapped out for the appropriate brakes. The rear wheel had a broken spoke, but I happened to have some spokes of the right length already due to a mistake made when ordering spokes for a Twenty wheel last year. Other than that, both bikes only need a bit of de-rusting, new chains and new tyres and they will be ready for their new owners. So far I have only serviced the rear wheels of each bike.

CIMG2638

The 1974 AW hub, after disassembly, cleaning and re-assembly.

Universal Folding Bike:

This is another bike I am servicing for a friend, a Universal folding bike with a Shimano “333” 3-speed hub and 20 inch (406 mm) wheels. The riding position is quite comfortable and upright, making the bike an ideal runaround machine. The 333 hub is in good condition, although the cable has rusted seized. 333 hubs were a lot less popular than Sturmey Archer hubs, meaning a replacement cable was not forthcoming. Thankfully, I should be able to come up with a suitable bodge using a cable clamp nut/bolt and a Sturmey Archer gear cable. Other than that it just needs a bit of rust removal, new tyres and a new chain.

CIMG2635

CIMG2634

The 333 hub shifts via a bell-crank and push-rod mechanism in a similar way to modern Nexus 3-speed hubs.

Repairing an AW hub

I have worked on a number of bikes with Sturmey Archer AW hubs, some over 30 years old, but this is the first time I have had to disassemble one. That fact alone is a testament to the quality of the design of the AW three-speed hub.
The hub in question is from a bike belonging to a good friend of mine, who received it as an Xmas present in 2010 and is now in the process of learning to ride. A lot of the work I did on the bike before Xmas was getting the gears to shift, due to a problem with the shifter it came with, meaning I missed the problem with the low-gear pawls as the bike was stuck in high gear until near the time it was ready for delivery.
AW LG pawls

Cutaway diagram of the AW hub, taken from Sheldon Brown’s excellent AW article. The low gear pawls have been highlighted in red, these engage with the hub shell in 1st gear, and are disengaged in second and third gear, leading to the characteristic Sturmey Archer “tick” when in higher gears. The high gear pawls are highlighted in green.

To disassemble an AW, you first need to remove the nuts and bearing cone on the left side of the hub. Once you have done this, the innards can be removed by unscrewing the right-hand ball ring, which is the bit behind the sprocket which screws into the hub shell. To do this you will need a hammer, a screwdriver and brute force.
CIMG2493

Everything from the left-hand side of the axle (the washer should be between the two nuts for them to be in their proper order). The 1st gear pawls and pins can be seen to the left, as well as the remains of the pawl springs

CIMG2492

The AW internals with the 1st gear pawls removed

Upon disassembly of the hub, the problem became clear, one of the pawl springs for the low gear pawl had come loose and been ground into dust. The other one was in bad shape too. Luckily I was able to order some replacements cheaply online. Whilst I waited for delivery, I decided to completely dismantle the hub and clean the rusty grease away, re-assemble and re-lubricate it and replace the missing/broken pawls.
CIMG2494

The locknut, washer, cone from the right hand side of the axle, next to the spring and washer which push the mechanism into 3rd gear by default when the gear cable is allowed to go slack

CIMG2495

Left to Right, the planet cage (top left), gear ring, right-hand ball ring and driver

CIMG2496

Left to right, the clutch sleeve, sliding clutch, axle key and thrust ring

AW exploded

Here is how it all fits together, the AW, shown as an exploded diagram, courtesy of hadland.me.uk (click image to enlarge)

The innards of the AW hub are not overly complex making servicing one a lot less daunting than you’d expect. Completely disassembling the hub allowed me to overhaul the bearings, of which there are three sets in the AW hub.
AW bearings

The three sets of bearings in the AW hub, highlighted here in red.

CIMG2498


The parts of the AW hub after cleaning

210511_10150153197509559_508394558_6592841_4576495_o

Here it is after being re-assembled, oiled (thanks to Jim for the oil tip) and screwed back into the shell.

201464_10150153199349559_508394558_6592865_759461_o

I also took the opportunity to install the white-wall Delta Cruisers which were requested by the bike’s owner


And here is the bike re-assembled with new Delta Cruisers front and rear. I think he should get a Brooks B66/67 next

It is difficult to take many/good pictures whilst doing this kind of job, because the filth and grease inside a 30 year old hub can make it undesirable to handle a camera. Despite this, I hope that this post helps others out there whose AW could use a bit of a tune-up, but have been put off by the fear that the innards would be too complex to deal with.