
The Sturmey Archer AW hub is 75 years old this year. The reliability of this design means that there are plenty of these hubs still in service. The ease of serviceability of this design means that returning one of these hubs to its former glory isn’t all that difficult. Many minor issues such as resistance to freewheeling, hub seizure, general resistance to rolling and problems accessing certain gears can be fixed by taking the hub apart, cleaning the internals and re-assembling it all with some fresh grease.
Whilst I have written about working on an AW hub previously, the nature of the work means that it is difficult to take pictures whilst cleaning and re-assembling the hub. Thankfully, this time I was able to get a little help with taking pictures. To open up an AW hub (and most other Sturmey Archer hub gears) remove the left-hand (non-drive side) locknut and cone and uncrew the right-hand ball ring using a hammer and a flat screwdriver on the semi-circular cut outs of the ball ring (these are not rounded on the older versions of the AW). This should let you get the internals out, axle and all. This can be further disassembled by removing the right-hand locknut and cone, which allows the rest of the hub mechanism to be taken apart.

One of the notches for unscrewing the right-hand ball ring

Left to right: The left-hand axle nut, non-turn washer, locknut, spacer and cone
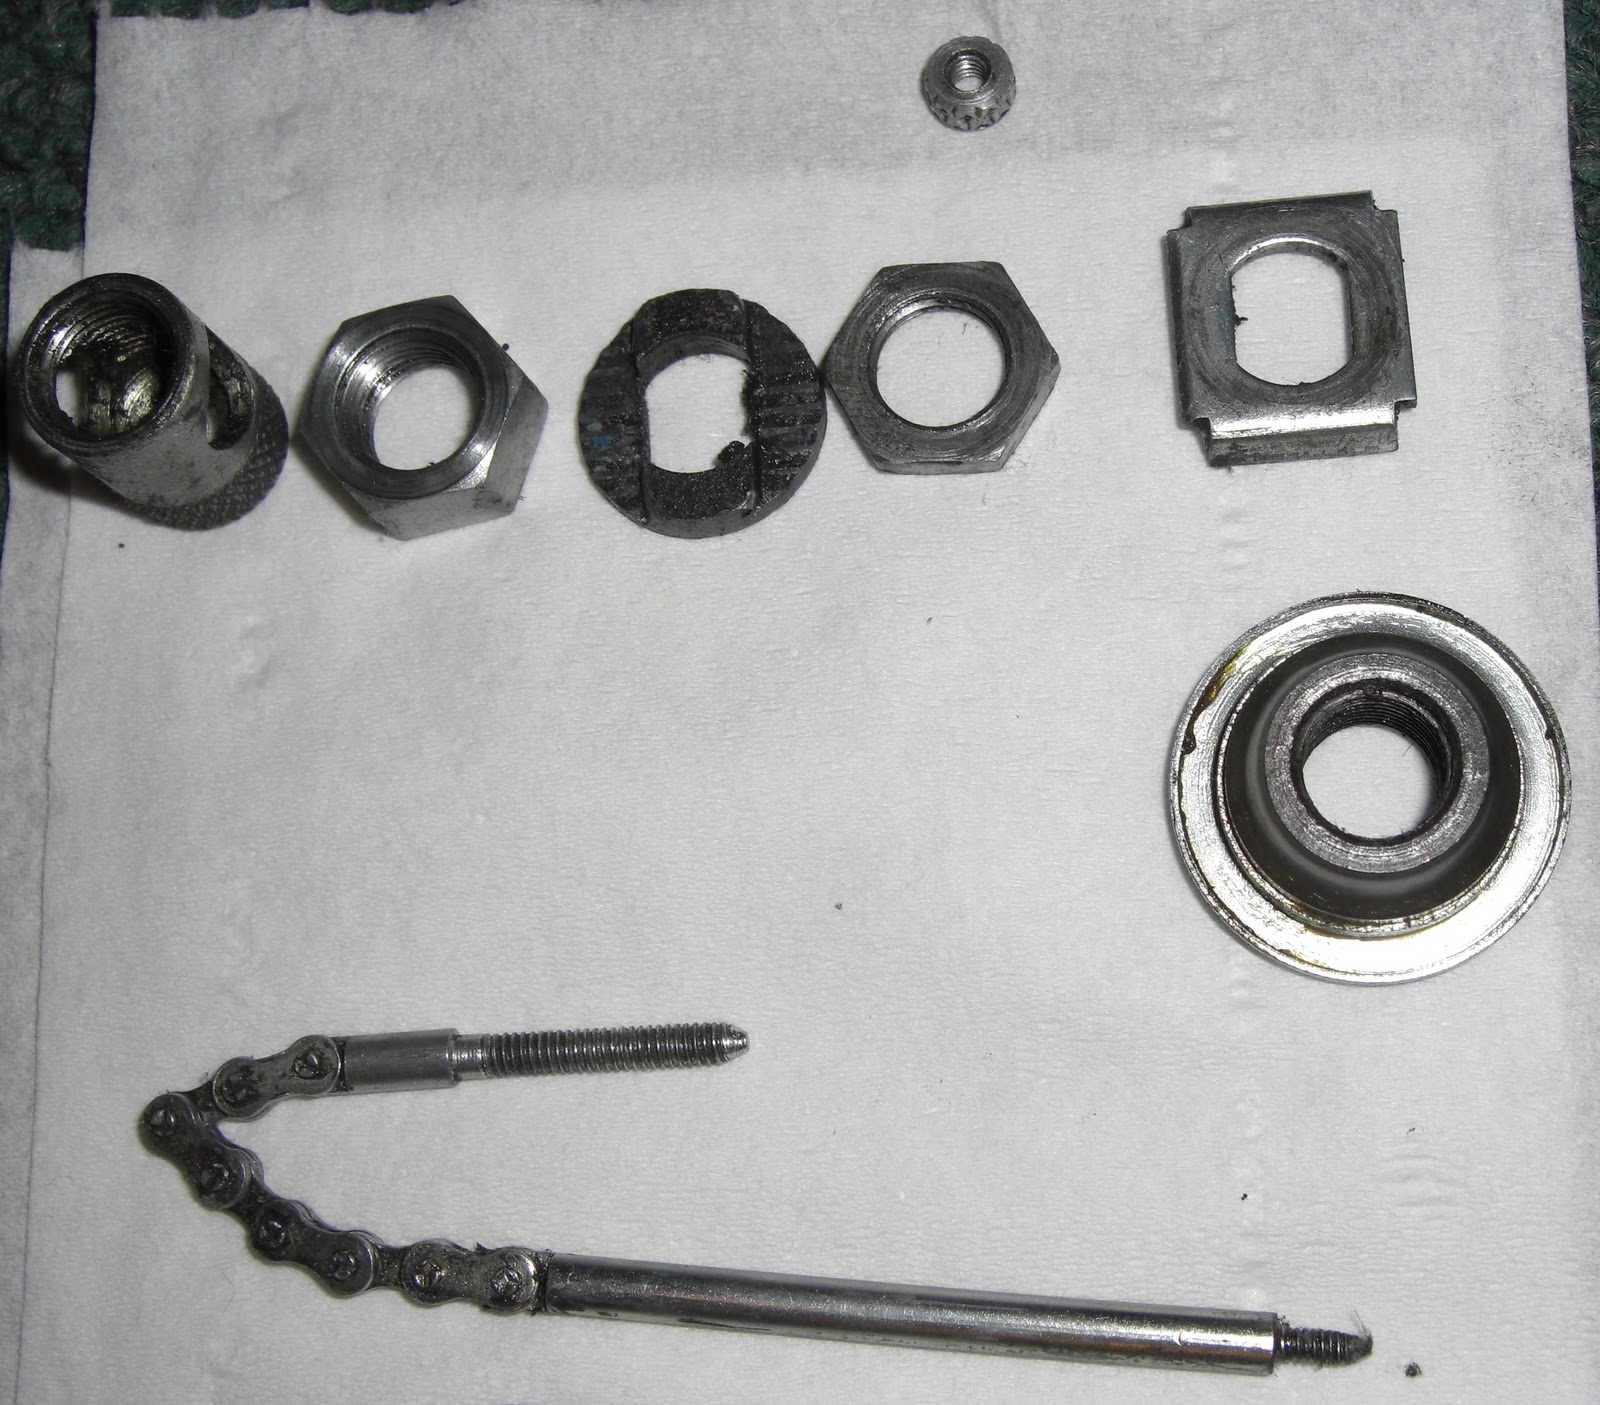
Left to right (top): right axle nuts (later integrated into a single piece), non-turn washer, locknut, cone lockwasher & cone. Middle: cone. Bottom: indicator rod (with indicator rod locknut seen above the locknut)
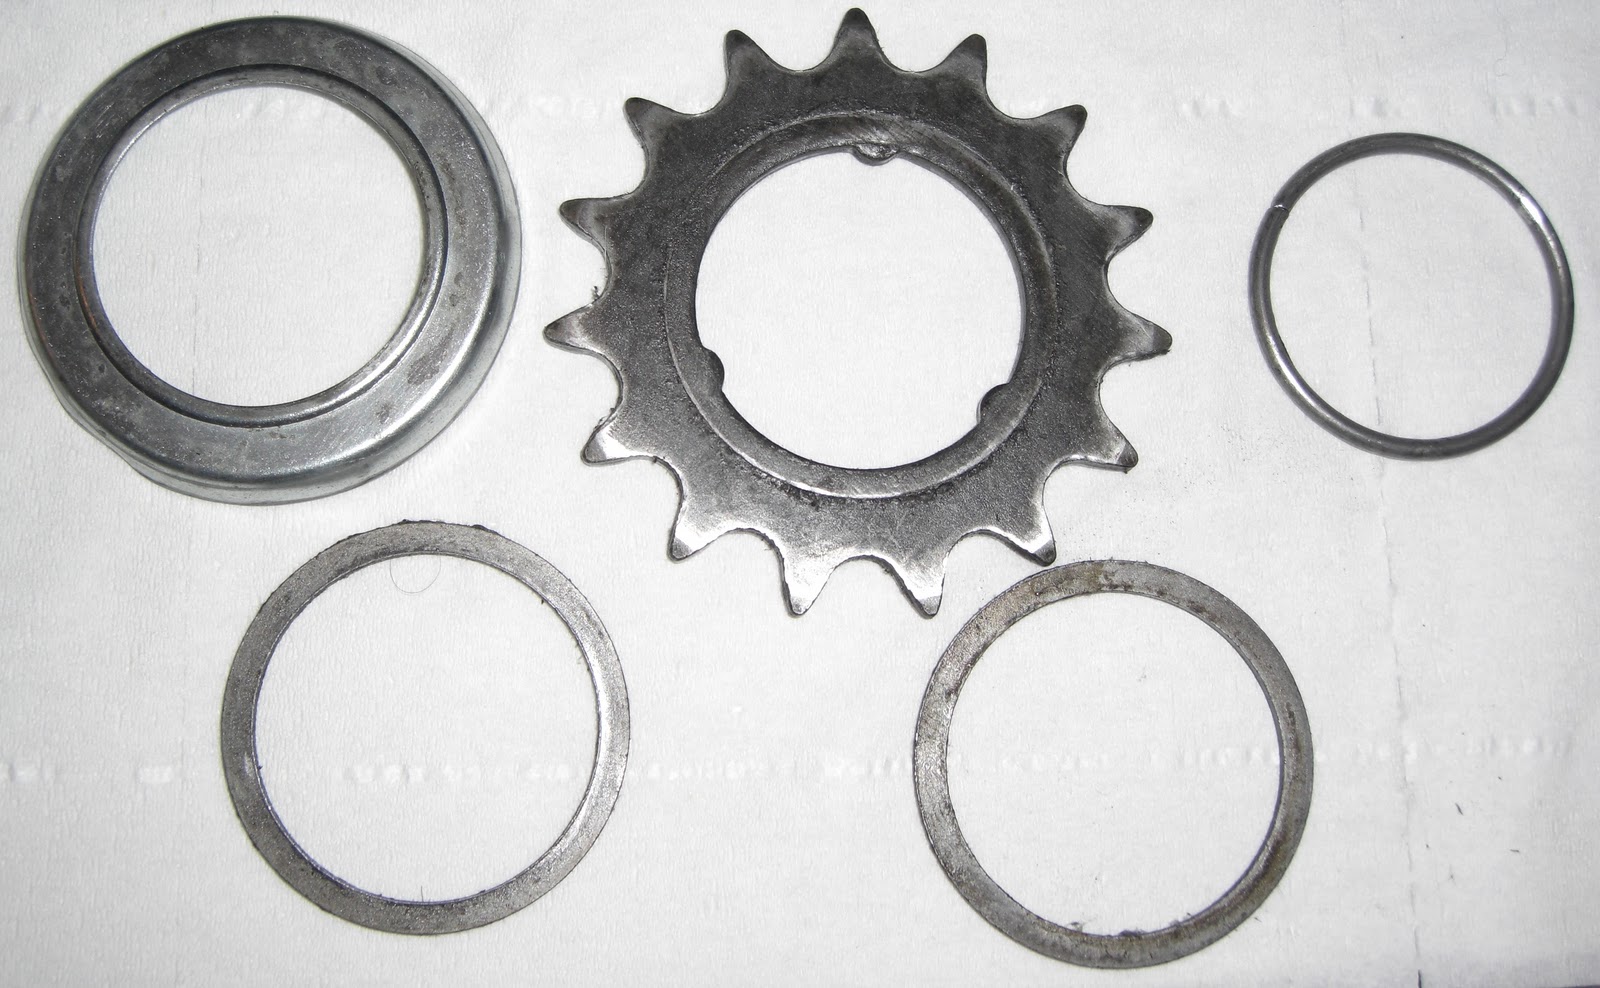
Left to right (top): Dust cap, sprocket snap-ring. Bottom: spacers. Assembled as: Dust cap, spacer, sprocket, spacer, snap-ring.

The driver assembly and clutch spring

Gear ring (left) and right-hand ball ring (right)

Left to right: clutch sleeve, clutch, axle key and thrust ring

Top: Axle (including sun pinion). Bottom (left-to right): Planet-cage, 4 planet pinions (cogs) and 4 pinion pins.
The low-gear pawls in the planet-cage can also be removed if necessary, although when removing these be sure not to lose the tiny pawl springs in the process. The same also goes for the pawls in the gear ring.
Once all this has been disassembled, a good cleaning with some degreaser and a cloth or paper towel should restore the hub to its former glory. Particularly dirty or rusty parts can be soaked overnight or cleaned with wire wool (just make sure to remove any left-over bits of wire wool before re-assembling the hub).

To re-assemble the gear mechanism, hold the axle vertically with the drive-side pointing up (axle hole above the sun pinion).

Add the planet pinions and the pinion pins back into the planet cage and place the assembly over the top of the axle with the planets at the top.


Add a dab of Sturmey Archer hub gear grease to the planet pinions and rotate the planet cage assembly around the axle a few times to distribute the grease around.

Place the clutch sleeve over the axle and line up the hole in the sleeve with the hole in the axle.

Place the clutch over the axle and the clutch sleeve.

Slide the axle key through the hole in the clutch sleeve and axle, with the threaded hole in the axle key lined up with the centre of the axle.

Slide the thrust ring over the axle key and clutch, lining up the grooves in the thrust ring with the protruding parts of the axle key.

Place the gear ring over the planet cage assembly and clutch assembly, being sure to line up the grooves inside the gear ring with the planet pinions.

Place the right-hand ball ring over the gear ring.

Add some lithium grease to the ball bearings within the ball ring (ideally more neatly than this).

Place the clutch spring over the axle, ensuring the plastic (or metal) ringed-end of the spring pointing upwards.

Place the driver over the axle. The clutch spring will push against the driver until the right-hand cone is added to hold the driver in place.

Add lithium grease the the ball bearings in the driver assembly and screw the right-hand cone onto the axle as with any other cup-and-cone bearing system.

Add the cone lockwasher and locknut.

Add lithium grease to the left-hand bearings.


Add the left-hand cone, spacer and locknut.


On the right-hand side, add the dust-cap, a spacer, sprocket, another spacer and snap ring to the end of the driver assembly.
The wheel may be bolted back into the frame, the indicator rod screwed back into the axle key and to the gear cable and the hub is ready to be tested. With any luck, the hub should perform just fine for another couple of decades. The ‘no intermediate gear’ (NIG) versions of the hub, such as the current AW hub, the S-RF3 and the gear mechanism in the X-RD3 are fairly similar to this, with minor changes to the clutch assembly and the driver, which has its own pawls in this version. There have also been numerous small revisions throughout the run of the original AW hub, although they should pose little trouble when using this guide as reference. The best advice I can give anyone who wishes to service one of these hubs is to just go for it; when disassembled the hub really isn’t as daunting as it may appear from reading this guide (or similar guides).

Thanks for this post, it is so clearly documented and photographed I'm inspired to start stripping one of my hubs! One question though, as the hub that most needs some attention is a Dynohub, I was wondering if you had any experience you could share relating to the risk of demagnetising the hub?
Nice post Chris – can see this page sending your hitcounter into overdrive :>DMe reckons you have those technical photos licked – the job is truly a good one. (Now how do we turn an AW3 into a 3SX?)
@Nick Salt,Sheldon Brown's website has some instructions for dismantling the front Sturmey Dynohub. Having seen both of these hubs up close, it seems almost certain that the innards of the dynamo mechanism are identical, with the AWG also squeezing in a 3 speed gear mechanism too. The instructions suggest that the dynamo mechanism can be removed as a single piece without demagnetisation being an issue. After that, the rest should be the same as the AW.@Ian,I think this'll be a slow burner, few will read this on the off chance they may want to service a hub in the future, but Google may lead them to it in the future if their hub is in need of some attention.
Great job, Chris — I found your photos really useful in my first attempt at fixing a broken AW. One note to other novice mechanics like me: when you're putting the guts back into the hub shell, it's probably best to hold the hub horizontally (i.e., the way it fits on a bike) — if you try to drop the internals into the hub shell vertically, the left-hand pawl pins can fall out and make a run for freedom.
thank you,excellent pictures,clearly written.I'm taking mine apart tommorrow!
@BG,You are correct, the low gear pawl pins don't always fall out if they have a bit of grim holding them in place, but on a cleaner hub they would've fallen out if held in the same manner as I did in the pictures.@Anonymous,I hope it went well.
It went very well ,thank you.I bought one that i thought was trash to practice on for 5 bucks,you couldnt even tell what it really was!Now I have a rebuilt 54'S/A too!
Pingback: Raleigh Twenty Stowaway | Chester Cycling
Hi,
Thank you for you info on how to restore these hubs!
Can I also use lithium grease on the planet pinions? I do not have the SA grease so I was wondering if I can substitute for something with a similar effect. I have lithium grease or teflon oil.
If you think the SA grease is the right thing I will have to go get some.
Thanks!
Sorry for the late reply, I guess this one must have slipped by unnoticed. lithium grease might be ok, but for minimising future problems, I’d go for the Sturmey grease. Once you have it, there is enough to last a lifetime.
Phil wood “Phil” grease in the green tube. Pedros or Park tool grease. The Sturmey- Archer England hubs before 2000 are one breed and the post 2000 Taiwan hubs are another. Singer sewing machine oil. No 3 in one it gums up. No W.D. 40 it is too light.
For Sturmey- Archer 3 speed A.W. hubs and more uses. Go to your auto parts store and pick up a bottle of :
Perma Tex Anti Sieze is a silver colored paste found at the auto parts store is a $7.50 bottle with a brush in the cap applicator brush. Smear it in the bearing cones on both end and in the ball bearing races. It is the best possible grease. It is not actual grease but is best used as such.
Pack front hubs with it and run loose ball bearings in front hubs. Use it as grease in headsets, bottom bracket cups use it as grease, smear it in the threads of the fixed and adjustable cups, smear it on the seatposts to prevent sticking. Smear it on cotter pins and in the cotter pin hole on the steel crank arms No more stuck cotter pins.
For cleaning dried oil and grease and for general cleaning use a product called “brak clean”
spray can of automotive brake cleaner (BE SURE TO HOLD THE CAN WAY, WAY BACK FROM WHAT YOU ARE SPRAYING!) All steel parts (not alloy) are cleaned and degreased with this. It dries up very quickly. Headsets, bottom bracket parts, hubs e.t.c. Be sure to keep it away from decals and transfers and box lining. Be careful with painted surfaces.
No front chainrings lower than a 40 tooth front and no rear sprockets larger than 24 tooth because the Sturmey- Archer 3 speed type A.W. hub made before 2000 CAN NOT TAKE THE STRAIN of the amount of torque. You shear the clutch key in half and tear up the hub. If you ignore this advice.
The dirty secret with these hubs are the terrible bearing cones that need to be replaced. Especially true with the dynohubs.
Use Singer sewing machine oil in these hubs and not 3 in 1 oil as it is too thick also no W.D.40 as it is too light and it dries and evaporated leaving a gummy film that slows the action of the pawl springs in the hub and causes them to break, requiring a re-build.
Well, I can give an update! I have Perma Tex Anti Sieze silver paste lubricant containing graphite in the rear Sturmey- Archer England A.W. 3 speed. I have been using it as grease in the bearings, on the driver bearings ring and smeared in the gear mesh and on the clutch of the hub. Works wonderfully. I have it in the front hub. I have it in the bottom bracket and in the headset. The whole bike is noticeably more quiet. It glides silently. This is an industrial lubricant that does not evaporate or run off. It is waterproof and seals out salt and moisture. It’s temperature range is better than grease. I have it daubed it in the cotter pin hole of the steel cotter ed crank and on the cotter pin. My cotter pins will never stick again. Well, It’s working fine! This acts as a sound deadner and I can forget about lubrication or oil and leave this unattended and just ride and enjoy the bike. It really spins along. Use gloves when using it. Use the bottle and the brush version it is found at the auto parts stores about 7.50 for a lifetime supply. It is difficult to remove from hands takes a few washings with go- jo hand cleaner.
This particualar product is un -orthodox and unheard of in bicycle land. Bike shops don’t know about it and don’t use it. I have recommended Phil Wood grease, Pedros, and Park Tool grease and Singer sewing machine oil . Questions answered with 37 years experience. clarencekokkinis@aim.com Clarence_Kokkinis@yahoo.com
The older hubs are made out of machined steel and not the later presed steel powder formed parts. The older hubs are best, last longer and better running. Stay away from plastic spring caps
These hub cones are soft metal, of an inferior design. The dirty secret with these hubs are the aweful bearing cones. I have changed the cones, converted my Sturmey Archer G.H.6. front dynohub to quick release front hub skewers.
Performance is amazing, with new hub cones that are commonly found, better quality.
Especially good to be free of that inner bearing cone found on the Sturmey Archer G.H.6. dynohub.
Look up “Hubstripping” the group on the internet. I will post it here. They overhaul all different types of hubs.
I will offer my best advice. That is look up antique and vintage bicycle hubs from the 1930’s. The Sturmey- Archer a.w. goes back to 1936. The older hubs were made from machined, solid steel bar stock. These are best. You can find hubs new, never sold, old shop stock. They can be disassembled and cleaned in solvent and dried and re-assembled with fresh grease and oil and used and these are best. The newer hubs use fine powder put into presses and “steel” parts are made this way. It’s not as good. If you look at cheap furniture where the wood is fine dust and small tiny wood chips that are pressed in a press with glue mixed in and they produce boards this way. Well, it’s not solid wood. Same thing with these hubs. Go to e- bay and find vintage Sturmey Archer and you’ll be glad you did. The new stuff is fine. However take it from a Conusseur and devotee who knows the older stuff. The older stuff is solid.
clarence_kokkinis@yahoo.com clarencekokkinis@aim.com
The Perma Tex anti sieze is unconvential. Shops don’t use it. People don’t use this in bicycles. I have to recommend Phil Wood grease or Park tool grease or Pedros bicycle grease.
However there is nothing wrong with using it and …
Myself, I can report again another update as of March 28, 2013 that the rear Sturmey- Archer A.W. 3 speed hub works and continues to run marvelously, delightfully so with the gears and bearings swimming about in graphite laden Permatex anti sieze!
The bearings and wheel turns and turns and it quiets the noises of the bike. the bike glides and runs very well.
I use it everyplace on my bikes.
Pingback: Inside the Brompton Wide Range (BWR) Hub | Chester Cycling
Hi Chris,
I recently serviced my 67′ AW hub on my RSW16. I found out that the pin which holds the sun pinion to the axle is worn on one side, and reassembled it anyway as there were no information that the pin wasn’t suppose to look like that, such that it kinda looks like a pen tip, and after 2 rides, the hub got stuck in 2nd gear. I pulled it apart again and found that the sun pinion pin on the axle had broken into 3 pieces, and the sun pinion had come loose. Is there a fix for this? Can i use any stainless steel rod and hold the sun pinion in place on the axle? I reckon no one had ever experienced this problem before
Pingback: Armstrong (not that one) English 3 Speed | G-Man's Connecticut Bike Blog
Would you know if its possible to convert this from a 3 spline to a 9 spline? Now that sturmey does stock 9 splines..
How do oil the Sturmey Archer externally? Where abouts do you oil it?
Hi Warren.
The models which require oil lubricating have a small black oiling port on the hub shell itself. The ones which do not have this port are intended to be (much less frequently) grease lubricated, which requires disassembly.
This is truly the best guide I’ve seen thus far!!!! Taking a 1975 SA hub apart tomorrow – reviving a dead Raleigh. Was dreading the rebuild (needed axle replacement), but I’m feeling confident now.
Many thanks for the very clear instructions and photos.
I have an AW hub on my Brompton dated June 2000 but surprisingly it is not fitted with the NIG variant. It works perfectly but rattles like hell when freewheeling over a rough surface. I have stripped it down and all parts have play in them but very little apparent wear (I have checked this by measuring new parts). It had SA grease inside that had mainly broken down into an oily sludge. I am now experimenting with alternate greases to deaden the rattle. I find that almost all greases sold today in the UK are NLGI #2 grade whatever fancy name is on the label. This is too thick and causes drag. I need something thinner that will remain stable.
Any ideas on Greases available in the UK please? Remember that almost all grease in the UK will be NLGl #2 grade whatever it is called.
Just serviced my rear hub. Your manual and pictures worked perfect.
Thank you very much..keep up the good work.
Regards
Glafcos
Is there a link for a front dynohub as well??
Hi Glafcos,
I’m glad the information I posted here was useful to you. I’m afraid I’ve never had to service one of the front dynohubs from the same era, but I have definitely seen information out there describing the process. I believe that you need to be extra careful with how you handle the magnet, and I’d definitely advise having a look online for some guidance.
Yes I know I have to be very careful with the magnet since it’s very sensitive. I did found information on how to do it but since yours were extremely easy and helpful I thought I asked.
I might not service it if the wheel spins, rear wheel wasn’t so I had to remove the hub, cleaned and greased it up.
You can buy EP00 grease (which is what Sturmey’s grease is, I believe) as either Castrol Spheerol, or as general semi-fluid grease on ebay. I seem to remember EP00 is equivalent to NLGI0 or NLGI00. I bought a kilo of EP00 off an ebay seller for about £15 including delivery, and I’m just rebuilding an X-RD5 with it now. The hub needed a new primary sun pinion, three new pinion pins and a clutch-spring washer. The parts came from SJS Cycles and are going in this afternoon, well covered in EP00 🙂
I’ll be trying out the EP00 on my Shimano Nexus hubs too, as oil-dipping as per the official Shimano method isn’t blowing my socks off really – the oil leaks out if the bike is leaned over towards the drive side, even just up against a wall for long enough, and the wheels can’t be laid on their sides (if the bike’s in the back of a car, for example). EP00 sounds as if it will probably be a much better bet.
hi
can anyone give me a date on a Sturmey Archer hub as its undated
All i have to go by is that its an AW9??????? The cog and left hand side of the shell is black
Many thanks regards Steve
the indicator rod pin can indeed break in half…collar and spring locate against it..another could be made providing one could thread it..